
You have selected
Converse Low Tops
We invite YOU to Customize your own pair of shoes!
Watch the video below to learn how to customize your shoes.

Make sure to keep this page open as you’ll need it to submit your order.
*For Converse shoes, in Step 20, please do not select the 'Comfort Upgrade' option, as this upgrade is not available.
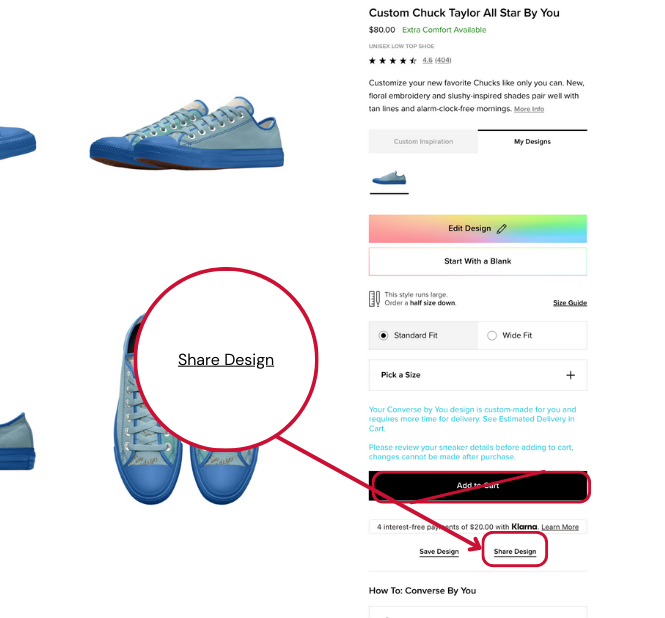
WAIT FOR YOUR SHOE TO LOAD. Then select Share Design. At no point should you add your shoe to the cart or check out.
STEP 6

STEP 4
Don’t forget to add your optional Embroidery text to your shoes.
This is available in the last selections in your MAIN MENU.

STEP 3
Please note that upgrades are not available.

STEP 1
On the page, select “Edit Design”, to begin creating your custom shoe.

STEP 2
Follow through the main menu of options for each customizable component. Use the arrows to move to a different section.

When you are finished with your shoe design, select the Finish Editing located above your shoe image.
STEP 5
STEP 3

Select COPY LINK.
STEP 7
STEP 4

Return to the STEP-BY-STEP INSTRUCTION PAGE. Scroll to the bottom of the page to complete the submission form. This is where you will PASTE YOUR COPIED LINK.
STEP 8
STEP 5
*For Converse shoes, in Step 20, please do not select the 'Comfort Upgrade' option, as this upgrade is not available.
STEP 01
On the page, select “Edit Design”, to begin creating your custom shoe.
STEP 02
Follow through the main menu of options for each customizable component. Use the arrows to move to a different section.
STEP 03
WAIT FOR YOUR SHOE TO LOAD. Then select Share Design. At no point should you add your shoe to the cart or check out.
STEP 04
Select COPY LINK.
STEP 05
Return to the STEP-BY-STEP INSTRUCTION PAGE. Scroll to the bottom of the page to complete the submission form.
